OpenSCAD: Homework LS 2016/2017
Evaluation of the Homework
Důležité:
The Homework interface and location of the object in the Cartesian space is crucial for the semi-automatic tests that are being run on your submissions. If you fail to position the object properly or your module does not follow the prescribed interface including the default arguments, you will fail. However, for the lack of anything better, you cannot see the actual test results (we have planned for a better system, but is is not yet ready). To compensate for this inconvenience we offer you several pre-deadline checkpoints, that will make it easier for you to catch easy mistakes with drastic impact. It is completely up to you if you will use those checkpoints, but is is highly recommended to use at least two. If you just submit a code few hours before the deadline and all tests will fail because you made a typo or located the object in wrong direction or changed the default arguments, it’s your problem. You have been warned.
Keyboard
Your task is to create an OpenSCAD module that renders a simple keyboard. The layout of such keyboard is fully parametric, but for your convenience it is only possible to have grid based layouts.
A keyboard consists of it’s body with keyholes and the individual keys.
Keyboard body
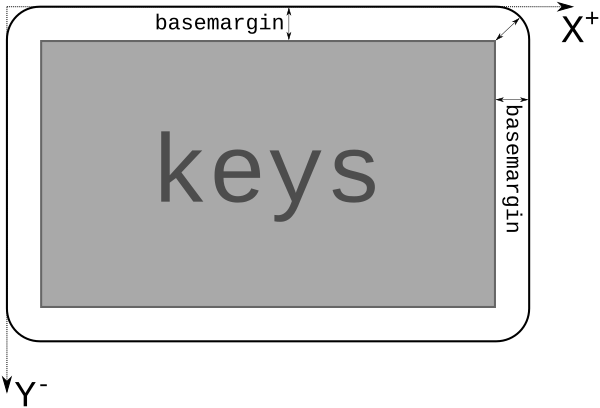
The keyboard body is a cuboid with 4 rounded corners. The overall dimension is based on basemargin and basez parameters and the dimension of the part with the keys (see next section for more info).
Here are some pictures:
From top:
From side:

The axes drown in this pictures are crucial for the right object placement. Notice from the first picture that the keyboard goes to positive X and negative Y directions from the origin (this sounds weird but it is reasonable given the nature of the layout specifications). The keyboard is laying on the XY plane, all Z coordinates are equal or greater than zero.
Keys and key holes
The keys section consist of keys and holes for them.
One key is a curved cuboid with some text on it. Let’s see the anatomy of a single 1-to-1 sized key and it’s hole.
From top (the dotted line indicates the key hole):

From side (view along the Y axis):

Notice the keydip parameter. It is fixed for key of any size, so the radius of the curve has to be adaptable. Also note that the curve is done along the Y axis - i.e. it is not a spherical, but cylindrical curve.
keysize is a module-global parameter. But keys can occupy multiple cells in the grid, so each key has it’s size. The above key has size [1,1].
The holes are separated with a defaultspace sized wall (if defaultspace is not zero). Here is how multiple keys look like (click to enlarge):
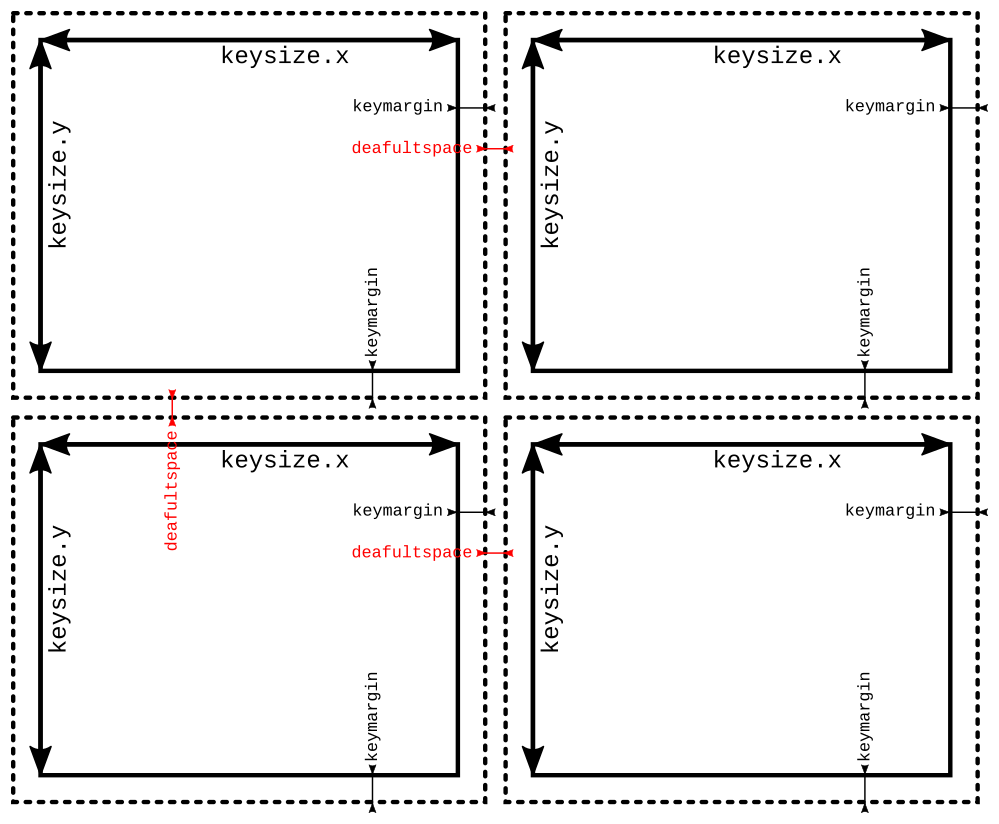
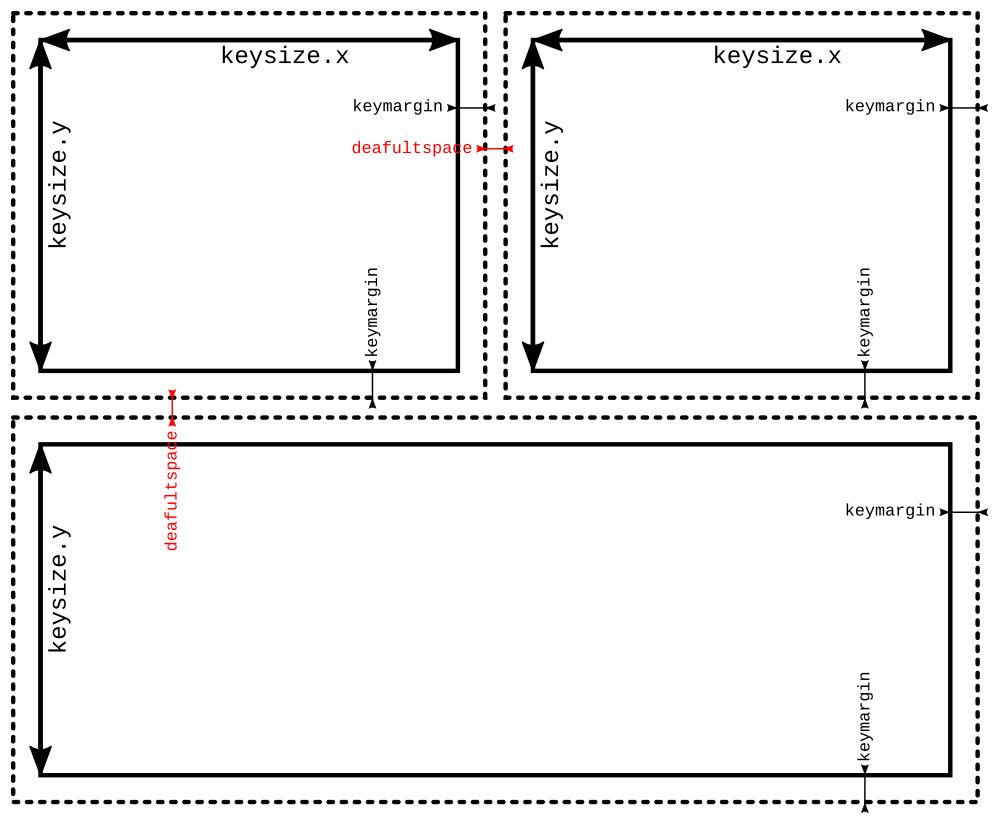
This is how larger keys are sized: they occupy the space for multiple keys including the border between them (the key in the bottom row has size [2,1]):
Here’s how the keys on the keyboard look from the side (along the Y axis). First image shows 3 [1,1] keys, the second one shows one [1,1] and one [2,1].


Note that the defaultspace-sized "wall" is only between keys. The size of the "wall" next to first/last key is basemargin-sized.
Also note that the keys are floating in the air; this is of course a not-printable situation, but intended in this Homework anyway.
Text on keys
Some of the keys might have text written on them. From the XY point of view, the text is centered on the center of the key:

If the key is bigger (e.g. [2,1] or even [5,10]), the text is still on the center of the key.
The module-level global parameters textsize and textz will change the size of the letters.
textsize shall be given to the text() primitive as size argument. textz indicates the depth of the letters.

Note that the text is also cut with the cylindrical curve. Do not try to bend the text, just extrude it straight up and cut a cylinder our of it. The radius of both curves on above picture is always the same for one key.
How to deal with text? Here is an example call to the text() primitive that generates given text in the center of XY plane. Note that the result is 2D:
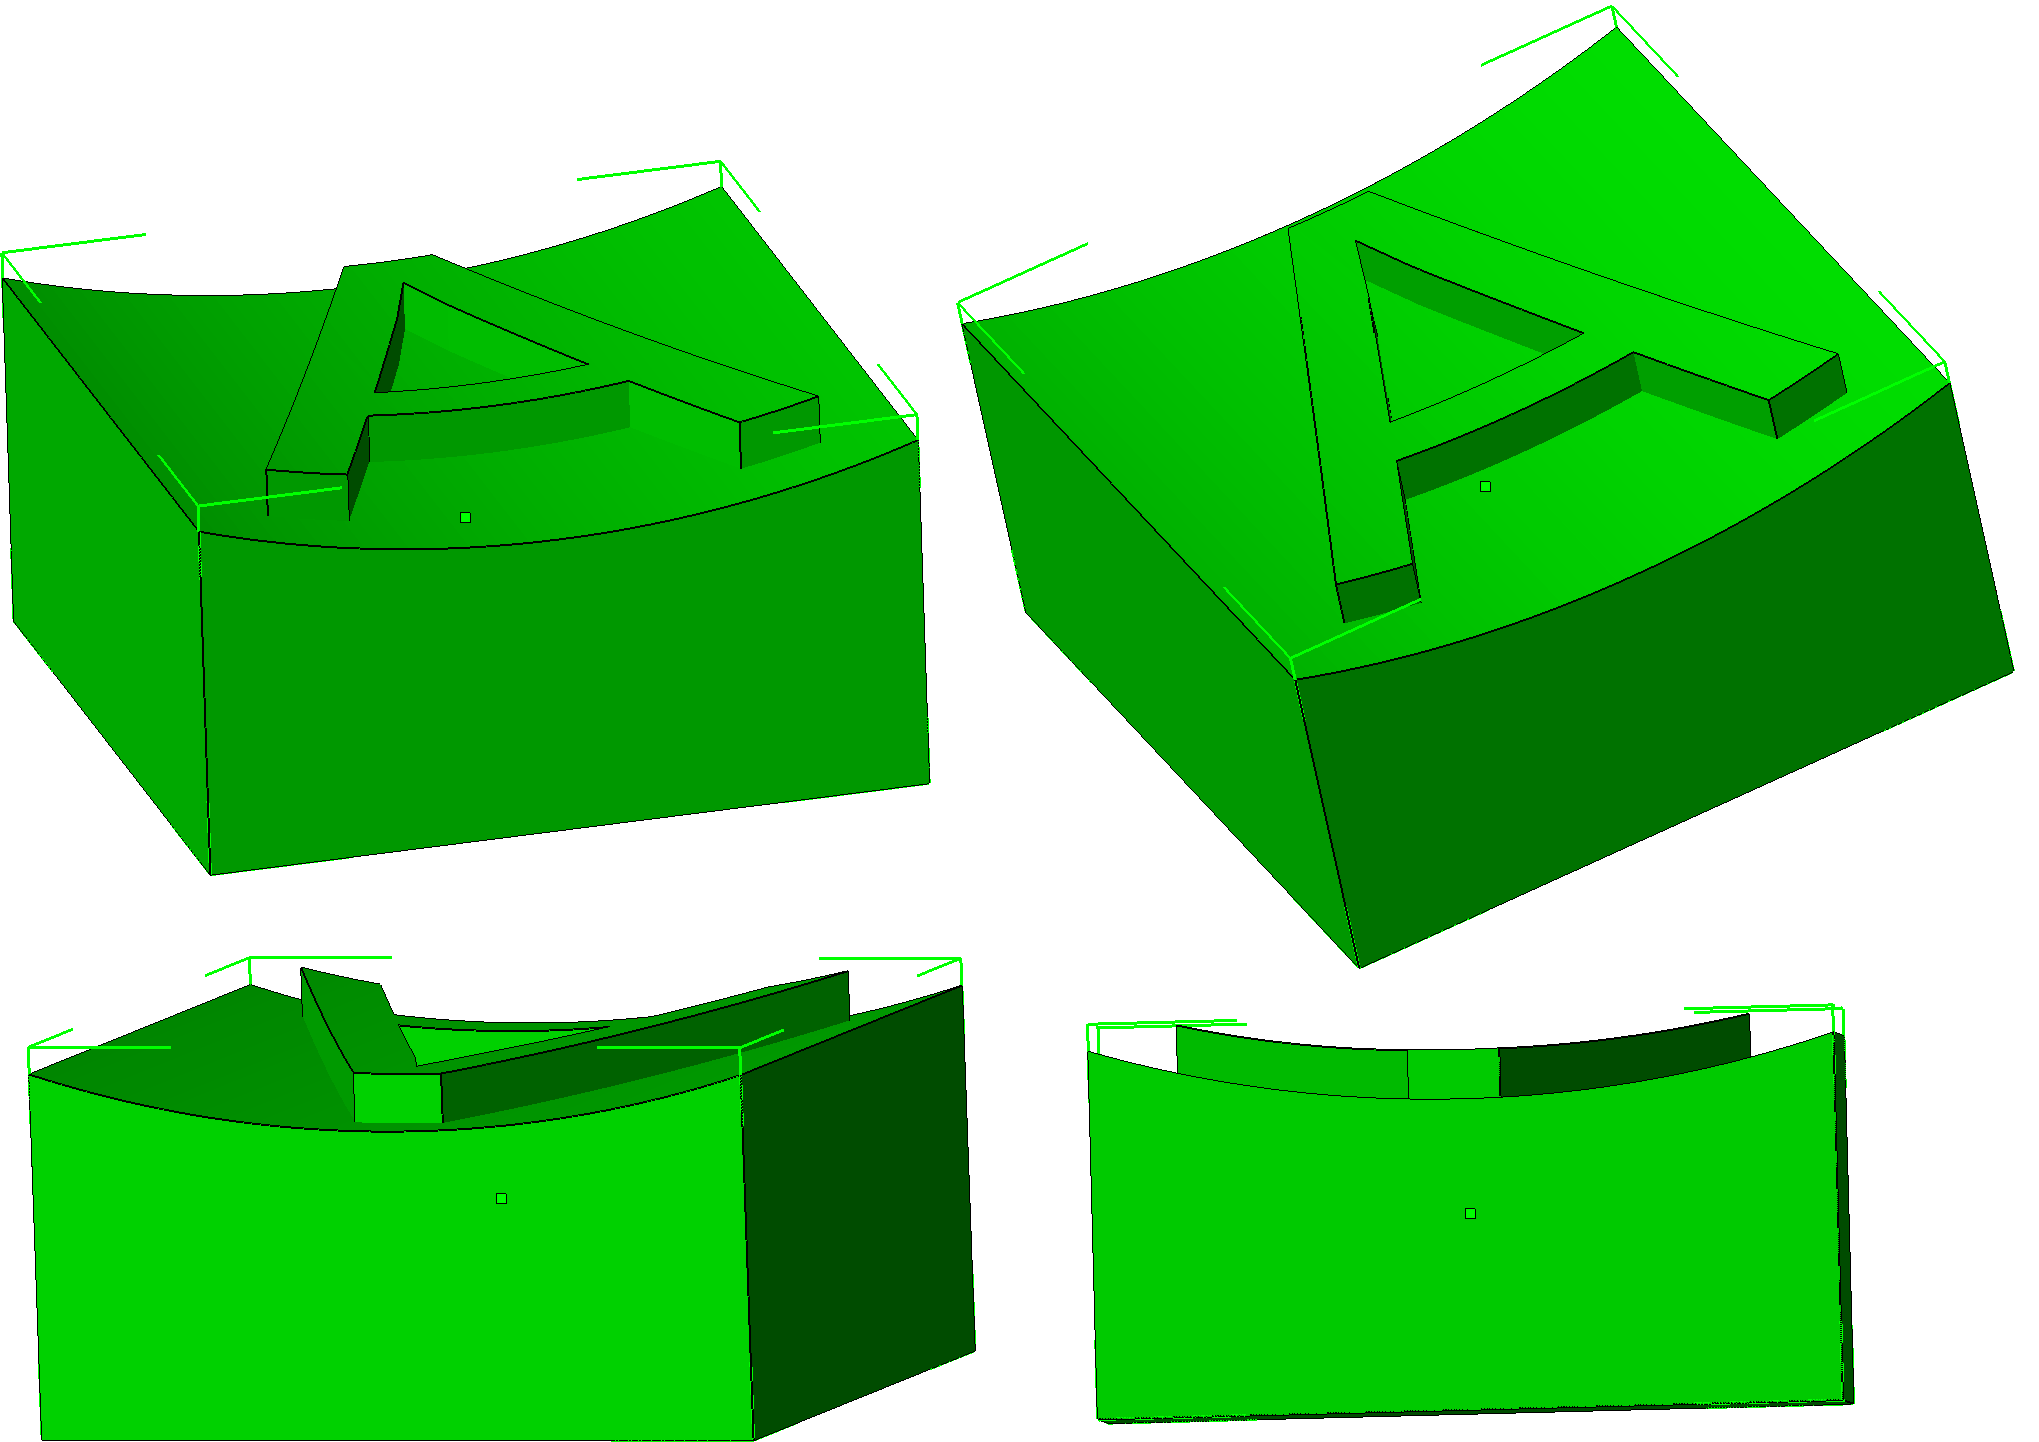
text("A", halign="center", valign="center", size=textsize);Do not change the default font. Also, always assume the parameters are given in a way that the text will fit on the key.
Here are some 3D views of a key with letter A on it:
Pro-tip: When linear extruding text and diffing something out of it, add convexity=10 to linear_extrude() call for better F5 preview.
Keyboard layout
Keyboard layout is specified in the layout parameter. It is a vector of vectors of vectors (huh!). Let’s start in the most nested part. One key is represented as a vector of 0, 2 or 3 values. Empty vector represents an empty space without a key. First two values are size and the third optional field is a label. (Use len(vector) to find out length of an vector.) See some examples:
[1,1] // standard-sized key without a label
[8,1] // very long key without a label (such as the Space key)
[3,1,"Return"] // the long Return key (such as on some keyboards)
[1,2,"+"] // a high key with plus sign (such as on the numpad)
[10,10,"I love OpenSCAD"] // a crazy oversized key with a long text. still valid
The keys forms rows. Multiple rows are a layout. Rows have equal lengths.
For your convenience, placeholder keys (empty vectors) are placed in the layout where another (large) key is occupying the physical space.
So when there is a [2,1] key, there is one [] placeholder just after that. If there’s a [3,1] key, there are two [] placeholders just after that. Also, if a key is high, such as [1,2], there is a [] placeholder in the next row. Only valid layouts will be tested.
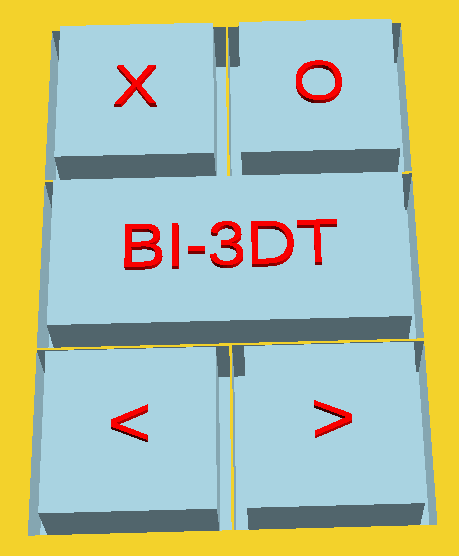
Some real examples? let’s start with something simple:
[
[[1, 1, "X"], [1, 1, "O"]],
[[2, 1, "BI-3DT"], []],
[[1, 1, "<"], [1, 1, ">"]],
]
With keys going across multiple rows:
[
[[1,2], [1,1]],
[[], [1,2]],
[[1, 1], []],
[[2,2], []],
[[], []],
]
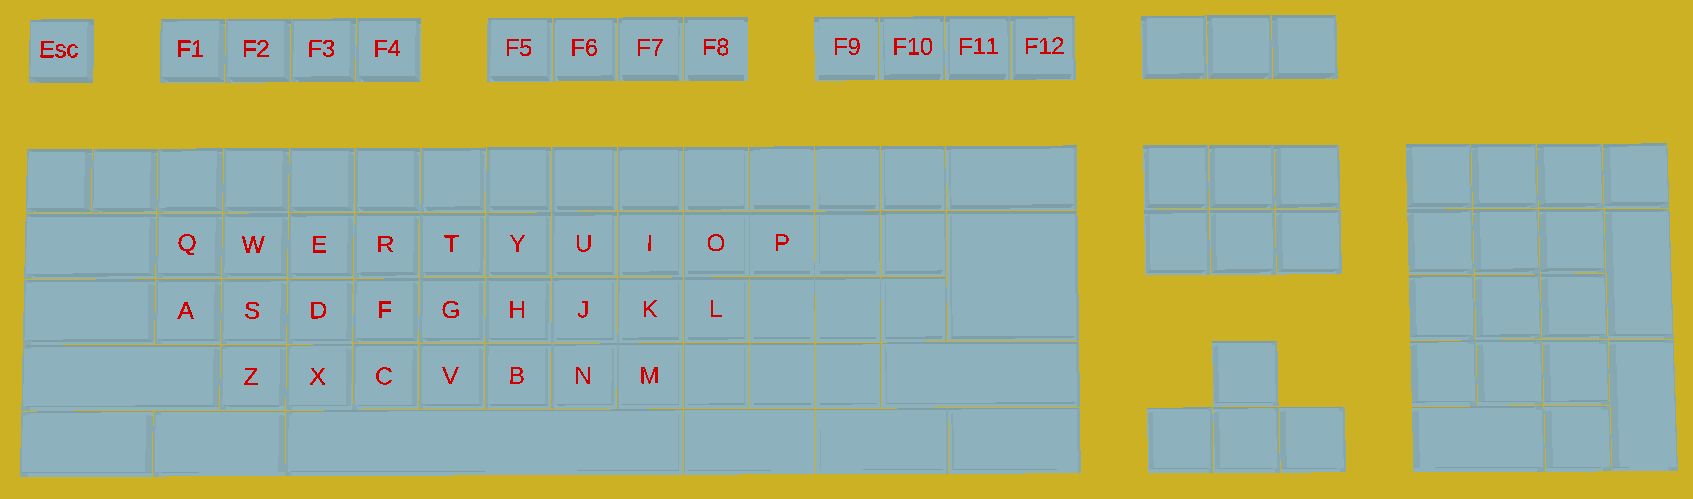
And something more interesting:
[
[[1,1, "Esc"], [], [1,1,"F1"], [1,1,"F2"], [1,1,"F3"], [1,1,"F4"], [], [1,1,"F5"], [1,1,"F6"], [1,1,"F7"], [1,1,"F8"], [], [1,1,"F9"], [1,1,"F10"], [1,1,"F11"], [1,1,"F12"], [], [1,1], [1,1], [1,1], [], [], [], [], []],
[[], [], [], [], [], [], [], [], [], [], [], [], [], [], [], [], [], [], [], [], [], [], [], [], []],
[[1,1], [1,1], [1,1], [1,1], [1,1], [1,1], [1,1], [1,1], [1,1], [1,1], [1,1], [1,1], [1,1], [1,1], [2,1], [], [], [1,1], [1,1], [1,1], [], [1,1], [1,1], [1,1], [1,1]],
[[2,1], [], [1,1,"Q"], [1,1,"W"], [1,1,"E"], [1,1,"R"], [1,1,"T"], [1,1,"Y"], [1,1,"U"], [1,1,"I"], [1,1,"O"], [1,1,"P"], [1,1], [1,1], [2,2], [], [], [1,1], [1,1], [1,1], [], [1,1], [1,1], [1,1], [1,2]],
[[2,1], [], [1,1,"A"], [1,1,"S"], [1,1,"D"], [1,1,"F"], [1,1,"G"], [1,1,"H"], [1,1,"J"], [1,1,"K"], [1,1,"L"], [1,1], [1,1], [1,1], [], [], [], [], [], [], [], [1,1], [1,1], [1,1], []],
[[3,1], [], [], [1,1,"Z"], [1,1,"X"], [1,1,"C"], [1,1,"V"], [1,1,"B"], [1,1,"N"], [1,1,"M"], [1,1], [1,1], [1,1], [3,1], [], [], [], [], [1,1], [], [], [1,1], [1,1], [1,1], [1,2]],
[[2,1], [], [2,1], [], [6,1], [], [], [], [], [], [2,1], [], [2,1], [], [2,1], [], [], [1,1], [1,1], [1,1], [], [2,1], [], [1,1], []],
]
Module interface
module keyboard(
        layout=[[[1,1,"A"]]],
        keysize=[13,13,7],
        keydip=2,
        textsize=4,
        textz=0.5,
        keymargin=1,
        defaultspace=0.25,
        basez=10,
        basemargin = 10,
        upwards=2
        ) {
    // your implementation goes here...
}
Note that impossible values will not be tested. However some values such as margins, borders, spaces, distances etc. work when 0.
You are encouraged to write helper modules. Make sure your code is usable from a different file via the use <keyboard.scad> directive. Manipulating $f* variables is forbidden.
The code has to maintain a good overall quality. Repetition is a bad thing, use modules, functions and loops instead. It is not recommended nor needed to use recursion. Magical constants has to be acompanied with an explaining comment. External libraries (including MCAD) are not allowed.
Submitting and grading
- Maximum points: 30
- For tests: 25
- For code quality: 5
- (Code has to pass at least 3 tests in order to be entitled for the code quality points)
Use GitHub to submit your code. Go to the following link classroom.github.com/…. It will create a repository in our GitHub organisation. Update your username in the USERNAME file right after your repository is ready. Put your implementation into the keyboard.scad file. Use git (recommended) or GitHub’s interface for file editing (not recommended). We will grade and add feedback to the default (master) branch only.
Checkpoints:
- 2017-03-27 01:00 AM
- 2017-04-03 01:00 AM
- 2017-04-10 01:00 AM (no new tests will be added after this checkpoint)
- 2017-04-17 01:00 AM
We will usually provide feedback within 24 hours. Expect an issue in your GitHub repo or a thumbs up emoji in the comments section of tested commit.
Deadline:
- 2017-04-24 (including that day)
ChangeLog
Here are the changes made from first alpha announcement.
keydipparameter was missing from the interface, added